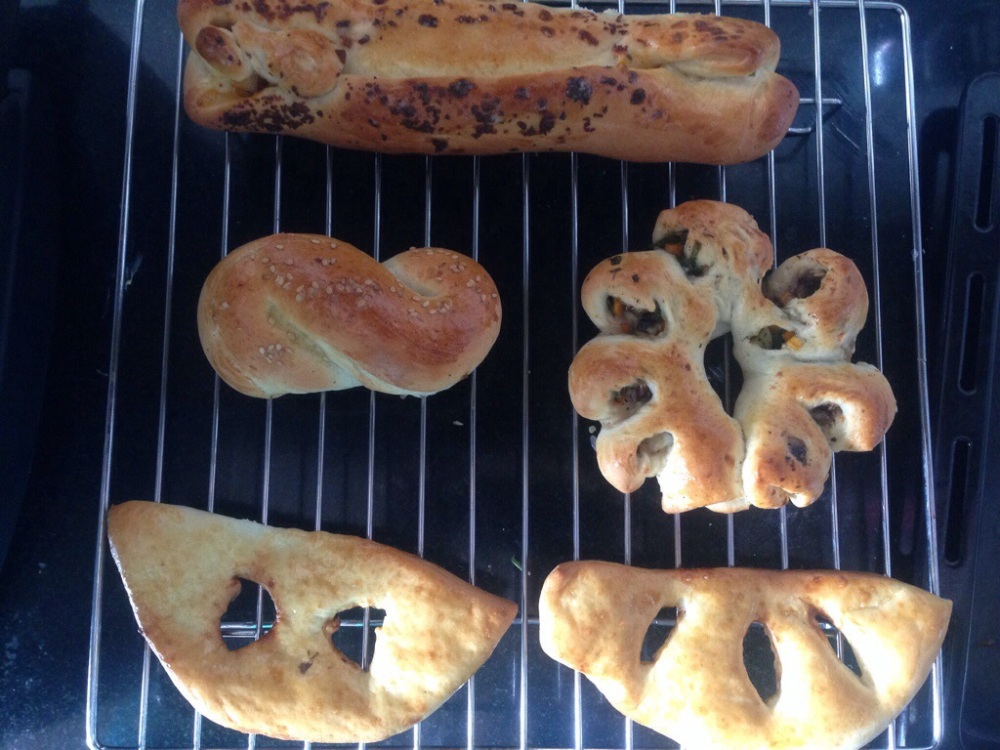
There are few things to beat a good bread roll – the slightly crisp exterior and the soft elastic interior and the way it is chewy yet easy to make and eat.
I love bread rolls and have been searching for a good recipe. Finally I found one here.
The best part is you can make it anyway you like – plain, stuffed, different shapes, etc. what fun!
Ingredients
For the bread
1 1/2 cup All purpose flour (maida)
1/2 tbsp instant yeast / active dry yeast
1/2 tbsp sugar
1/4 cup warm water
1 tbsp olive oil
1/2 tsp salt
1. Mix water, sugar and yeast and set aside.
2. Mix the flour, oil and salt
3. Pour the yeast mixture into the flour mix
4. Mix thoroughly and knead for 15 mins till it is soft
5. Coat the dough in olive oil and keep it in a large bowl which is also greased in oil
6. Cover the bowl with a damp cloth and set aside for an hour till the dough doubles in volume
7. Punch down the dough and knead for 2-3 minutes
8. Divide it into 4 or 5 parts
9. Use a different technique for each part to make the bread in different shapes and sizes.
10. I made – one simple ‘8’ shaped dinner roll, 2 flat breads with holes in the middle and 2 stuffed breads. In order to cut out portions in the middle of the flat bread, use a knife to make the required shape and cut it with scissors.
11. Roll out one portion of the dough like a rectangular roti, put the stuffing on the dough and roll it to close. Press the dough lightly so that it sticks and does not open. The stuffing I used for this was tomatoes, garlic, spring onions, cream cheese, onions, mixed Italian herbs and green chillies.
12. Roll out and stuff another portion of the dough just like the one above. Bring the two ends together to form a circle. Cut half of the dough from the outer end and turn it slightly to face upwards. The stuffing I used for this was mushroom, spring onion, carrots, garlic, Italian herbs, onions, grated cheese and green chillies.
13. Beat an egg nicely and coat all the bread dough with it
14. Set aside for 10-15 minutes
15. Bake at 200C for 20-25 minutes till the bread gets a golden brown color.
16. Coat the breads with butter immediately on removing from the oven. It keeps the crust soft.
17. Cool on wire rack
Notes
1. For more detailed instructions on the bread designs please refer to the original recipe. It has pictures and is easier to understand
2. The stuffings are completely based on your imagination. You can use various combinations according to your taste
3. The most important thing is the kneading of the dough. It is slightly difficult to knead for 15 minutes or so but that is what impacts softness and elasticity to the dough and is well worth the effort
4. The damp cloth as a cover to the dough hugely benefits the rising of the dough. It rises faster so please use the damp cloth. I did not use it for quite some time and used to get irritated waiting for the dough to double in size.
If you need to add more dough or water when you start kneading you can do so. But ideally you will not need more than an additional sprinkle of dough to get the consistency right.
5. In case you are baking the flat bread, note that it gets done in around 15-18 minutes. So keep it on the tray closest to the oven door and pull it out. Let the others bake for 20-25 minutes.
Happy Baking!

